Monday, March 9, 2009

Winter Clam Bake

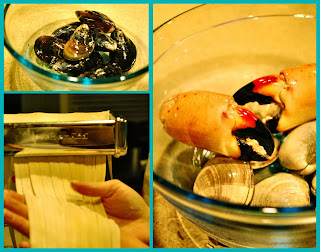
For Valentine's Day this year we made a fresh seafood pasta which I have been lazy to post. Although the flavors were amazing, the effort to get the crab meat out is something we won't be repeating. I'd recommend using preshelled crab or a mock for easier eating :)

The heat from the red pepper oil is a really nice background to the strong sauce and shellfish.

Sage Seafood Pasta
2 tbsp extra virgin olive oil
1/2 tsp red pepper flakes
3-4 green onions, chopped
1/2 onion, chopped
1/4 cup white wine
1/2 cup cream
1/2 batch fresh linguine pasta
2 tbsp Asiago cheese, grated
2 tbsp fresh sage, chopped
Salt/pepper to taste, about 1/4 tsp each

2 rock crab claws, washed
8-10 fresh mussels, washed
8-10 clams, washed
8-10 shrimp, deveined and washed

Prepare the fresh pasta and let dry. Start a large pot of water heating with salt.

In a 375 degree oven place the crab claws in seasoned water covered to 1/2 their height. Bake until done (about 20 minutes) or to other package specifications.

In a large pan heat oil with red pepper. Add onions, salt, and pepper; sauté till soft. Slowly add in wine and let evaporate. Add mussels and cover to let steam. Once the shells have opened strain from liquid and place in a warm location. Add clams to the remaining broth and cover till open. Remove and set aside with mussels.
Add cream to the broth and simmer on low. Cook the pasta in the preheated water for 2-3 minutes until it floats on top. Strain and add to the cream mixture. Add all the shell fish back in and cover letting the shrimp cook and other shells warm.

Top with Asiago and sage.

Friday, February 27, 2009

When the moon hits your eye

...like a big pizza pie that's amore...
Did you know that song was played in the credits of the award winning Moonstruck in 1987 staring Cher? Well neither did I until a Trivia night with some great friends in the city of pizza, Chicago.

While I'll never be able to toss a crust or slice a deep dish like those pros, I still love to make homemade pizza. In the winter or summer or anytime of the year they just seem to hit the spot. It's a meal my husband and I can have fun planning and making together. Every pie tastes different and each makes great cold leftovers!


Rustic Sausage and Red Onion Pizza

Herb Crust – prep time: 1 hr
1 packet (2 1/4 tbsp) yeast
1 tbsp sugar
3/4 cup warm water
1 tbsp olive oil
3 cups flour
1/4 tsp salt
1 tbsp diced sage

Combine yeast, sugar, and water in a large bowl and let sit until the mixture has turned foamy, about 8-10 minutes. Add olive oil, salt, and herbs. Slowly mix in flour until it forms a ball, you may not need to use all of it. Knead the dough for about 5 minutes on a floured surface or until it is no longer sticky. Place in an olive oil lined bowl and cover with a towel. Place in a warm location and let rise for at least 20 minutes.

On a floured surface roll out or hand toss the dough to a large pizza sized circle. When hand tossing it is easier to work slow and work from the inside out to stretch the dough. Place on a pizza stone or tray and fold edges over to create the crust. Let rise another 20-30 minutes.

Pizza
1 lbs ground sausage or other meat
1 red bell pepper
1/2 red onion
2 cups tomato sauce
1/2 lbs spinach, washed and de-stemmed
2 cups mozzarella cheese
1/2 cup provolone cheese (about 4 slices)

In a pan cook sausage until done, set aside in a large bowl. Slice red onion thinly and place in pan heating till soft with olive oil.

Cut pepper into bite sized squares and heat with onions. Once veggies are slightly soft remove and let sit with sausage.
Cut the spinach up and heat till wilted with a little salt.

Heat tomato sauce till warm in a small pot. Spread the sauce around the pizza crust. Layer sausage, peppers, onions, mozzarella, spinach, and provolone.
Bake in a 375 degree oven for 30 minutes or until crust is brown and cheese is melted. Let sit 5 minutes and slice.

Tuesday, February 3, 2009

Wrapped in Flavor

I'm a huge Food Network fan. I Tivo Ace of Cakes and I'll watch Good Eats when ever it's on. The combination of cooking and food science is really interesting to me. So when Alton did a show on wontons I just had to try making my own Potstickers.


There's an Asian market in my home town (I know weird) that happened to have them in the frozen section. I grabbed up a couple packages and brought them back to Minnesota to try out.


They were so easy! I made a little assembly line and finished the packages off. I froze what I didn't use that night and seriously, 4 months later I defrosted them and they tasted just as good.


Potstickers can be served with Chinese, Thai, Japanese, really any Asian food or any appetizer occasion. And since they are so fast (even frozen) to make it's worth the prep time to put them together before hand.


Alton Brown's Perfect Potstickers

Ingredients

1/2 pound ground pork
1/4 cup finely chopped scallions
2 tablespoons finely chopped red bell pepper
1 egg, lightly beaten
2 teaspoons ketchup
1 teaspoon yellow mustard
2 teaspoons Worcestershire sauce
1 teaspoon light brown sugar
1 1/2 teaspoons kosher salt
1/2 teaspoon freshly ground black pepper
1/4 teaspoon cayenne pepper
35 to 40 small wonton wrappers
Water, for sealing wontons
3 to 4 tablespoons Olive Oil
1 1/3 cups chicken or beef stock

Directions

Combine the first 11 ingredients in a medium-size mixing bowl (pork through cayenne). Set aside.


To form the dumplings, remove 1 wonton wrapper from the package, covering the others with a damp cloth keeping them damp. Brush the edges of the wrapper lightly with water. Place 1/2 rounded teaspoon of the pork mixture in the center of the wrapper. Fold over, seal edges, and shape as desired - either crimp sides for press with a fork. Set on a sheet pan and cover with a damp cloth. Repeat procedure until all of the filling is gone.


Heat a 12-inch sauté pan over medium heat. Coat bottom with olive oil once hot. Add 8 to 10 potstickers at a time to the pan and cook for 2 minutes, without moving letting the bottoms brown. Once the 2 minutes are up, gently add 1/3 cup chicken stock to the pan, turn the heat down to low, cover, and cook tightly for another 2 minutes, letting steam. Quickly remove the top causing the wontons to crinkle. Repeat until all the wontons are cooked. Serve immediately.


Monday, January 19, 2009

My Mexican Getaway

We’ve returned! We’ve come back from our little 10 day trip to Cozumel, Mexico with my family. And although it rained a bit, there was too little time with everyone, and way too few cheap cab rides, we made up for it with all the wonderful food we ate!


Between our previous trip to Cancun and this one, I have come to determine that the best food is definitely off the beaten path… just not too far.

The feasting was spotted with some really bad dishes that left me wishing I’d just stayed on the beach, but we had a streak of some amazing food also.

The restaurant we frequented most often was a second floor, open air Italian place called Prima’s.
They had a huge menu which featured mussels, conch, lobster, and steak; all accompanied by homemade pastas. So delicious we went there three times.

That’s right. I said three.

However this was not our favorite. The hands-down winner was another open air pavilion Italian stop called Guido’s. Between the puffy starter bread, fresh spinach pasta, stone pizza, and lemon coconut tart with blackberries we were done in.

And this was in Mexico. Which is why ‘off the beaten’ path gets a whole new meaning. There were plenty of fabulous taco dives that we were able to experience, classically served on small corn tortillas with any number of main ingredients. The only must was the addition of cheese.

There was a whole supermarket of interesting fresh breads and rice. There was even a mixed Ceviche that we travelled across town for. But the Italian, they know how to do Italian-Spanish fusion well on that island.


So go rent that scooter or jeep and drive. Trust the cab driver that will tell you he knows the best taco dive on the island. Walk until you’re hungry enough to eat anything. Just make sure you know how to get home.

Wednesday, January 7, 2009

Feliz Año Nuevo!

In preparation for our Mexican vacation we had a New Year's fiesta with friends. Enjoy!


Chicken Enchiladas
1 package large tortillas
1 lb (about 8 breasts) chicken
3 tbsp EVOO
2 tbsp Mexican spice mix (paprika, chili powder, cayenne pepper)
1 can green chilies
1 package cream cheese, room temp
1 cup sour cream
2 cups Jack shredded cheese
1 cup Cheddar shredded cheese
1 can enchilada sauce
Salt & pepper

In a 350 degree oven bake the chicken coated with the olive oil and spice mixture till done. Remove and let cool.

In a large bowl mix sour cream, cheeses, chilies, salt and pepper together till well mixed. Using a fork shred the cooled chicken up into small pieces. Add to the cheese mixture.

Set out a large lasagna pan and coat bottom with non-stick spray and a little of the enchilada sauce. Fill each tortilla with about 3/4 cup of the filling and roll length-wise, folding the ends in. Place in the pan. Repeat till ingredients are used up. Pour the remaining sauce over the enchiladas. Place tin foil over the pan.

Bake at 350 degrees for 1 hr or freeze and bake for approximately 2 hrs.

Tuesday, January 6, 2009

Happy and Healthy

So onto the healthy food! Bring on the salads, bring on the diets, bring on the gym! Right? Well even though this post is about salads it can still be yummy. One of the best ways to be healthy is to know what you are eating. It’s not about being pretentious or a scratch cook, but understanding what you are putting into your body will help you make good choices when you do choose to eat things.

And what better place to start than salad dressings! There are many savory and delicious dressings that can be made from the ingredients right out of the refrigerator in any home. I prefer Olive Oil based dressings; you can bring out a ton of different flavors with substituting only a few variations. Generally I follow the 3-to-1 rule when adding olive oil-to-vinegar, but if that’s too strong or too weak then just adjust to taste!

Vinegars come in so many flavors now that you may not even need to add much more than a Basic Dressing calls for. It’s best to let the mixture sit for at least 5 minutes before adding to your greens, the flavors may change a bit, so adjust to taste. We eat a lot of dark greens that come in a Spring Mixture, featuring Endive and Radicchio. These more flavorful greens stand up well to the dressings and are excellent with some crumbled cheese or strong olives.

Happy Healthy 2009 Eating!

Basic Dressing
3 tbsp EVOO
1 tbsp vinegar (white wine or regular)
1 tbsp stone ground mustard
1/4 tsp salt
1/8 tsp pepper

Mix together well and serve with any salad greens. Add garlic, anchovies, and parmesan cheese to make into a Caesar Dressing.

Raspberry Honey Vinaigrette
2 tbsp Raspberry pie filling or freshly squashed
3 tbsp EVOO
1 tbsp vinegar (white wine or regular)
1 tbsp honey
1 tbsp stone ground mustard
1/4 tsp salt
1/8 tsp pepper
3 tbsp water

Whisk all ingredients together till well blended. Adjust to taste.

Roasted Corn Vinaigrette
1 cup roasted corn kernels
3 tbsp EVOO
1 tbsp Apple Cider vinegar
1 tbsp Sherry
1/4 tsp salt
1/8 tsp pepper

Either grill a corn cob or roasting corn kernels in the oven till slightly caramelized. Mix with other ingredients in a food processor until blended. Let sit in refrigerator for at least 1 hr. Flavor will change with time, letting sit overnight yields best taste.

Sunday, January 4, 2009

Merry Christmas!

But wait you say! It's 2009! It's the New Year, you should be talking about resolutions and diets, not cookies.

Well think back just a week. Back to when you were sitting around with family and enjoying every butter-filled bite. Since we travelled to Wisconsin for Christmas this year I didn't get a chance to post the frosting cookies that I made. Sorry but you'll have to wait for a healthier post tomorrow...

These cookies started off as flaky brown cutouts taking over my kitchen counter. I soon thought to myself that Christmas had gotten out of hand this year and I should never have volunteered to bring treats. Along with the frosted cookies I also had a few batches of Pecan Tassies and some Chocolate Pistachio Bark in the works. After a couple hours, my hands tinted multiple colors, everything was done and I was ready for packing up.

The recipe is taken from i shot the chef's blog. While I might not have the professional pictures she has, I think they turned out just as tasty!

So the next time Christmas, or any other holiday, rolls around try these out for a new easy recipe.

Sugar Cookie Recipe
2 1/2 c. all purpose flour
1/4 tsp salt
1 tsp baking powder
2 sticks butter, room temperature
1 c. granulated sugar
1 tsp vanilla
1 large egg
1/2 c. sour cream
Royal Icing
3 large egg whites
4 cups confectioners sugar
1/2 tsp lemon juice
1/2 tsp orange zest
food coloring paste
In a large bowl whip butter and sugar together until creamy. Add vanilla, egg, and sour cream till mixed. Add salt, baking powder, and flour (a little at a time) until the dough is consistent and well mixed.

Wrap in plastic wrap and refrigerate for at least 1 hour. Take a little dough at a time and roll out on a well floured surface until about 1/8 thickness.

Cut out shapes with cookie cutters, rerolling the dough until used up. Place on a non-stick tray and bake about 15 minutes in a 350 preheated oven. Do not over bake. The edges of the shapes will be slightly brown.

Remove to a cooking rake and let cool completely.

To make frosting mix all ingredients together to make a base white color. Separate some of the icing into small bowls and add food coloring until desired color. Letting the mixture sit and set up a bit will allow easier and less liquid icing.

Once the cookies are cooled they can be decorated with the icing and any other decorations. Let sit out for at least 2 hours to allow the icing to set.